Monday, 31 December 2012

Craft Your Passion #143 Get Well Soon

Happy New Year's Eve everyone!  Wow 2012 certainly went by fast, hopefully 2013 will be as great and eventful, and I wish everyone a very Happy New Year!  With that said it is Monday so that means its time for another Craft Your Passion Challenge.  If cold and flu season hasn't hit your area yet it is bound to be on its way, so this time we are asking you to create a 'Get Well Soon' card.  Here is what I came up with:


I started with this image from sponsor Stamp Fairy called Lenny.  I was thinking that Lenny is feeling a little blue, except for his sore nose, so I coloured him accordingly.  I corner rounded the corners and inked the edges of the panel he is on and went about constructing the rest of my card.


I chose some patterned papers and card stock, cut everything down and inked the edges.  I formed the main panel, added some burlap ribbon, and some blue rickrack.  The main panel was adhered to the card front, and Lenny was foam taped over the ribbon.  I added some twine to a nice big button, and added it to the card also with foam tape to ensure it stuck well.  Lastly I added the little sentiment banner.


For the centre of the card I stamped the coordinating sentiment on white, inked the edges, and matted with the same patterns.


Now its your turn!  Create your 'get well' project and link it up at Craft Your Passion Challenges by Sunday, January 6th.  Make sure to check out the blog to see what prizes are being offered this week.  And don't forget to visit the rest of the DT.  They have created some lovely projects as always!  :)


I used the following supplies to make my card:

Card Stock:  Gina K Designs In the Navy, Neenah Desert Storm, October Afternoon Woodland Park.

Stamp:  Digital - Stamp Fairy Lenny  Rubber - Stampin' Up! Petite Pairs.

Ink:  Colorbox Fluid Chalk Ink Creamy Brown, Blue Iris.

Embellishments:  May Arts jute twine, Really Reasonable Ribbon burlap ribbon, Rickrack ribbon, button from stash.

Adhesive:  Scotch ATG, foam squares, glue dots.

Tools:  Paper trimmer, bone folder, scissors, Ranger blending tool, We R Memory Keepers Corner Rounder.


Tuesday, 25 December 2012

Use it Tuesday #46 All about 2013

Merry Christmas!  I hope you are all having a lovely holiday with your families, and since it is the second Tuesday of the month its time for another Use it Tuesday challenge!  Consider it a present from us to you!  ;)  Since it 2012 is at an end, we would like to to create a project with the new year in mind.  Its all about 2013!  Here is what I came up with:


I decided to make a card to celebrate the coming new year!  I used a lot of scraps on this project, and I started with the Bazzil newsprint. I love this stuff so I have been using it sparingly.  I didn't want to just use it the way it was.  I decided to cut the panel size I wanted, and cut it into approximately 1" squares.


I decided to keep everything grey silver and white, so I dry embossed and inked with silver a panel of white from my scraps, matted it from some grey from my stash (just about the last of my Stampin' Up Basic Grey),  added some ribbon and adhered it to a white card front.  for the focal panel I matted a leftover piece of homemade glitter paper (you can just barely see the sparkle peaking through the squares) with more grey and foam taped the squares in a random manner.  Lastly I added the sentiment banner that I hand wrote, and some rhinestones.


For the centre I matted some inked white with grey, then newsprint.

Now its your turn!  We want you to create any project reflecting some aspect of the new year!  Make sure you link it up at Use it Tuesday by January 4 and you could win a chance to join us as a guest designer in an upcoming challenge.  Just don't forget to include what hoarded item you used in your post or you won't be considered in the draw.  

I used the following products to make my card:

Card Stock:  Stampin' Up!  Basic Grey, Bazzil Basics Newsprint, Neenah Solar White, Gina K Designs Pure White.

Ink:  Brilliance Starlite Silver.

Embellishments:  Scrappin' Supplies rhinestones, May Arts curly ribbon.

Adhesive:  Scotch ATG, foam squares.

Tools:  Paper trimmer, bone folder, scissors, Martha Stewart Score Board, Cuttlebug, Cuttlebug Scrollwork Embossing Folder.

Monday, 24 December 2012

Craft Your Passion #142 Alter it

Hi Everyone!  Merry Christmas!! It is Christmas Eve, and it is also a Monday, so that means its time for another Craft Your Passion Challenge.  This time we are asking you to alter something.  Your project does not have to be a card and you can alter anything you like.  For those of you who celebrate Christmas this will be a good reason to use up some of the leftover packaging, or wrapping paper you have after the gifts are all unwrapped.  In my case I decided to use toilet paper rolls and paper towel rolls.  Here is what I came up with:


I love these wreaths I've been seeing on Pinterest and other places, and its similar to a wreath I made back in the spring, you can read the post here.

 I started by collecting some paper towel and toilet paper rolls. I think I ended up using about four paper towel rolls, and five or six toilet paper rolls. I painted them all white, smooshed the rolls flat, and trimmed the rolls into 1" wide pieces.  For the base I trimmed some strips of paper 1/4" wide and glued several layers into a circle.  I then started hot gluing my 'leaves' until the wreath was the size I wanted.


For decoration I tied some small pieces of sparkly ribbon, and added some poinsettias that I made in the same manner as you can find in this post.  I had made several sizes of the flowers as I had intended to use them on various cards and projects but never got around to using them.  I found they worked perfectly here.  I added some glitter pen and I was finished!

Now its your turn! Create your altered project (it can be anything) and link it up at Craft Your Passion Challenges by Sunday December 30th in order to be included in the draw.  Make sure to check at the main blog for prizes and sponsor information.

And don't forget to visit the rest of the DT and see the lovely inspiration they've created for you!


I used the following products to make my project:

Altered Material:  Toilet Paper Rolls and Paper Towel Rolls.

Card Stock:  Neenah Solar White.

Stamp:   Delicious Doodles Poinsettia

Markers:  Bic Rambunctious Red, Prairie Berry, Yellow Blaze, Margarita Green.  Sakura Gelly Roll Clear Star.

Paint:  White acrylic.

Emellishments:  May Arts Curly Ribbon

Adhesive:  Scotch Quick Dry, hot glue sticks, foam squares.

Tools:  Paint brush, scissors, glue gun

Friday, 21 December 2012

MFP Blog Hop Day #4 Kilt Fun

Welcome to Mark's Finest Papers December Blog Hop! 


This month's New Stamp Set Releases are
Ivy & Blossoms Featured December 18
Oh Beans Featured December 19
Recipe Card Featured December 20
Kilt Fun Featured December 21

Please hop along with us! You have a chance to win one of the above stamp sets! Just comment on the following blogs (don't forget this one), each day for more chances to win! (You do NOT have to comment on all the blogs each day! The names are drawn randomly!) All four winners will be announced on December 22, 2012 on the Mark's Finest Papers blog. You can go back and comment if you missed a day. (HINT: The more you comment, the more chances you have to win and comments on the MFP blog count twice!) The deadline for commenting is 11PM EST (12AM ATL) on Friday December 21, 2012.

WOW can you believe it is December already? All of us here at Marks Finest Papers, a Heinrich Co want to wish all of you and your families a very Merry Christmas! It is time for our December Blog hop and we Scotts some great deals and stamp sets for you this month. 


 The special stamp set we have for you this month is called " You've Got Style".


Today's set is called "Kilt Fun".


I love background stamps and this set includes a great one you could use for many projects.  I have two cards to share with you today, here is my first one:


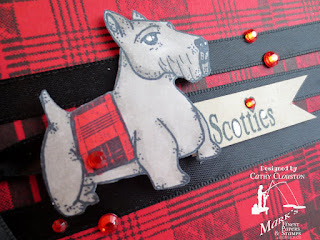
When I saw this set I immediately pictured red and black plaid so that is what I went with.  I started by stamping the image on red card stock with black ink.  I added ribbon to the panel, matted it in black, and adhered it to kraft card base.  


I stamped the little dog on white, coloured it with alcohol markers, and trimmed out.  The sentiment was stamped on a banner strip, and both the sentiment and the image were foam taped to the card front.  I added some glitter pen to the doggies eyes to make them sparkle, and to the sentiment.  Some rhinestones finished the card front off.


I decided to make this a note card, so I didn't put a sentiment inside.  I did however mat more kraft with black and red card stock, and added some red and black punched hearts to echo the heart in the sentiment.  I added more glitter pen as a final touch.


My second project is being shown on the main blog today. 


On the second card I wanted to stamp the plaid in an unexpected colour.  I decided to keep things fairly monochromatic, so I stamped the image in brown on kraft.  I distressed the edges and foam taped it to a kraft card front.  Some dashed lines were added with a gel pen and a ruler.


I heat embossed the hydrant in white on kraft and trimmed it out.  I decided to add some shadowing by using a water based blender pen and the same ink I stamped the plaid in.  I foam taped the image to the card.


The sentiment was also heat embossed in white on a distressed strip, and a bit more shadow added.  Of course I banner cut the ends of the strip (when do I not, lol) and foam taped that to the card.  Some rhinestones finished the card front off.


With the centre I kept things simple by only heat embossing the sentiment inside.


You can see how much I have enjoyed this set so far, but this isn't the only amazing set this month.     Why not go to Mark's Finest Paper's Store and have a closer look at what is being offered this month!

Oh, and this is a blog hop after all so don't forget to check out what the rest of the DT has come up with!  The main blog has lots of inspiration as well.  Happy Hopping!  :)


I used the following supplies with my first card:

Card Stock:  Neenah Desert Storm, Solar White, Gina K Designs Onyx Black, Stampin' Up! Real Red

Stamps:  Mark's Finest Papers Kilt Fun

Ink:  Versafine Onyx Black, Memento Tuxedo Black

Markers:  Copic W3, W5.  Sakura Gelly Roll Glitter pen

Embellishments:   Ribbon from stash, Scrappin' Supplies rhinestones

Adhesive:  Scotch ATG, foam squares, glue dots

Tools: Paper trimmer, bone folder, scissors


I used the following supplies on my second card:

Card Stock:  Neenah Desert storm

Stamps:  Mark's Finest Papers Kilt Fun

Ink:  Colorbox Fluid Chalk Ink Chestnut Roan, Memento Blender Pen. Versamark Watermark Ink

Embossing Powder:  Martha Stewart Bright White

Embellishments:  Scrappin' Supplies Rhinestones, Sakura Gelly Roll white gel pen.

Adhesive:  foam squares

Tools:  Paper trimmer, bone folder, scissors, Tonic Tim Holtz distressing tool.


Thursday, 20 December 2012

MFP Blog Hop Day #3 Recipe Card

Welcome to Mark's Finest Papers December Blog Hop! 


This month's New Stamp Set Releases are
Ivy & Blossoms Featured December 18
Oh Beans Featured December 19
Recipe Card Featured December 20
Kilt Fun Featured December 21

Please hop along with us! You have a chance to win one of the above stamp sets! Just comment on the following blogs (don't forget this one), each day for more chances to win! (You do NOT have to comment on all the blogs each day! The names are drawn randomly!) All four winners will be announced on December 22, 2012 on the Mark's Finest Papers blog. You can go back and comment if you missed a day. (HINT: The more you comment, the more chances you have to win and comments on the MFP blog count twice!) The deadline for commenting is 11PM EST (12AM ATL) on Friday December 21, 2012.

WOW can you believe it is December already? All of us here at Marks Finest Papers, a Heinrich Co want to wish all of you and your families a very Merry Christmas! It is time for our December Blog hop and we Scotts some great deals and stamp sets for you this month. 


 The special stamp set we have for you this month is called " You've Got Style".


Today's set is called "Recipe Card".


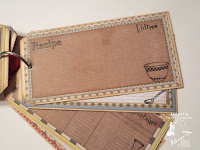
This was another fun set to work with.  The obvious choice was to make some recipe cards with this set, and so I decided to make a recipe card book out of shipping tags which I can use as another Christmas gift:


I decided to use some Basic Grey Basics packs for to use for the part to write the recipes on, and since I knew not much pattern would be showing I chose a 6x6 pack with lots of smaller patterns.  Once made that decision I decided on which patterns I wanted to use and the number of tags to make.  Everything was trimmed down and inked with light brown ink.  


Once I layered my papers I stamped each of the tags with "Recipe" at the top, along with a category and a small image.  The back of each panel was layered with the same papers as on the front, and the "yum yum" sentiment stamped into the bottom corner.  There is lots of space to write a recipe!  The images I have included here are quite small, but if you click on one it will enlarge.


For the final two tags I used the mini "Recipe Completer" set.

Once my recipe card tags were finished I had to make a cover for the mini book.  I layered more patterns on either side of another tag and stamped some of the larger images.  I stamped sentiments on scraps of the basic patterns, banner cut the ends and adhered with foam tape.  Some rhinestones were placed as if sprinkled over the top.   I also added "To" on the front where I could write the recipient's name, and "From" on the other side where I could sign and maybe write a small note.


I put the tags on a binder ring and added some ribbon and twine to finish it off.

This set is great for recipe cards and would help you make a great gift for someone moving out on their own for the first time, or maybe someone you would just like to share some recipes with.  But, you don't have to just make recipe cards with this set, you could make thank you cards, birthday cards, and maybe even gift tags for some baking that you might give as a gift.  This is a great set!

You can see how much I have enjoyed this set so far, but this isn't the only amazing set this month.     Why not go to Mark's Finest Paper's Store and have a closer look at what is being offered this month!

Oh, and this is a blog hop after all so don't forget to check out what the rest of the DT has come up with!  The main blog has lots of inspiration as well.  Happy Hopping!  :)


I used the following supplies on my projects:

Card Stock:  Ranger Manila Tags, Basic Grey  Basic White 6x6 pad, Basic Grey Basic Kraft 6x6 pad, Lilybee Design Harvest Market 6x6 Tiny Tablet.

Stamps:  Mark's Finest Papers Recipe Card Starters, Recipe Completer

Ink:  Versafine Onyx Black, Colorbox Fluid Chalk Ink Creamy brown

Embellishments:  Scrappin' Supplies rhinestones, May Arts Jute Twine, red ribbon from stash, binder ring from dollar store.

Adhesive: Scotch ATG

Tools:  Paper trimmer, Ranger blending tool.

Wednesday, 19 December 2012

MFP Blog Hop Day #2 Oh Beans


Welcome To Mark's Finest Papers December Blog Hop! 


This month's New Stamp Set Releases are
Ivy & Blossoms Featured December 18
Oh Beans Featured December 19
Recipe Card Featured December 20
Kilt Fun Featured December 21

Please hop along with us! You have a chance to win one of the above stamp sets! Just comment on the following blogs (don't forget this one), each day for more chances to win! (You do NOT have to comment on all the blogs each day! The names are drawn randomly!) All four winners will be announced on December 22, 2012 on the Mark's Finest Papers blog. You can go back and comment if you missed a day. (HINT: The more you comment, the more chances you have to win and comments on the MFP blog count twice!) The deadline for commenting is 11PM EST (12AM ATL) on Friday December 21, 2012.

WOW can you believe it is December already? All of us here at Marks Finest Papers, a Heinrich Co want to wish all of you and your families a very Merry Christmas! It is time for our December Blog hop and we Scotts some great deals and stamp sets for you this month. 


 The special stamp set we have for you this month is called " You've Got Style".


Today's set is called "Oh Beans":


I am a big coffee drinker and have been since high school - I'm talking at least 3 cups a day, some of them fancy, some of them not.  So when I saw this set I thought it was right up my alley!  Like yesterday's set I didn't quite have enough time to do as much with it as I would like, but I have some great ideas so make sure to check back in January!  In the meantime, here is my card for today:


Any time I see a word collage stamp my first reaction is to make my own patterned paper, and this time was no different.  Since this is a coffee themed stamp, I decided to stick with browns with a bit of pink thrown in.  I stamped the word collage with brown on kraft, then chose some patterns and card stock to coordinate.  I trimmed everything down, assembled the larger panel with twine and washi tape and adhered it to the card base.  


The edges of the kraft panel were distressed and foam taped over the twine.  I then stamped the images on some velum, tore it to the size I wanted and adhered it to the front of the card.  I used glue dots placed under the images so the adhesive wouldn't show.


For the centre of the card I stamped the sentiment and image on a distressed piece of kraft and matted with the same patterns that were used on the front.   I think this would be a cute card to invite someone on a coffee date, or just a note to a fellow coffee lover! 


You can see how much I have enjoyed this set so far, but this isn't the only amazing set this month.     Why not go to Mark's Finest Paper's Store and have a closer look at what is being offered this month!

Oh, and this is a blog hop after all so don't forget to check out what the rest of the DT has come up with!  The main blog has lots of inspiration as well.  Happy Hopping!  :)


I used the following supplies with my project:

Card Stock:  Stampin' Up! Chocolate Chip, Vellum Card Stock, Neenah Desert Storm, October Afternoon Woodland Park 8x8 collection.

Stamps:  Mark's Finest Papers Oh Beans

Ink:  Colorbox Fluid Chalk Ink Chestnut Roan

Embellishments:  May Arts Jute Twine, washi tape from www.peachycheap.com

Adhesive:  Scotch ATG, foam squares, glue dots.

Tools:  Paper trimmer, bone folder, scissors, Martha Stewart score board, Tonic Tim Holtz distressing tool.

Tuesday, 18 December 2012

MFP Blog Hop Day #1 Ivy & Blossoms

Welcome to Mark's Finest Papers December Blog Hop! 


This month's New Stamp Set Releases are
Ivy & Blossoms Featured December 18
Oh Beans Featured December 19
Recipe Card Featured December 20
Kilt Fun Featured December 21

Please hop along with us! You have a chance to win one of the above stamp sets! Just comment on the following blogs (don't forget this one), each day for more chances to win! (You do NOT have to comment on all the blogs each day! The names are drawn randomly!) All four winners will be announced on December 22, 2012 on the Mark's Finest Papers blog. You can go back and comment if you missed a day. (HINT: The more you comment, the more chances you have to win and comments on the MFP blog count twice!) The deadline for commenting is 11PM EST (12AM ATL) on Friday December 21, 2012.

WOW can you believe it is December already? All of us here at Marks Finest Papers, a Heinrich Co want to wish all of you and your families a very Merry Christmas! It is time for our December Blog hop and we Scotts some great deals and stamp sets for you this month. 


 The special stamp set we have for you this month is called " You've Got Style".


Today we are featuring a set called "Ivy & Blossoms":


I love this set!  I thought it was pretty when I got it but it wasn't until I started working with it that I realized how much I love it.  I have more ideas for it, but due to the time of year I didn't have time to follow through with them all.  I guess that just means you'll have to keep checking my blog to see what I have up my sleeve! In the meantime here is what I came up with today:


I decided to make a note card set as a Christmas gift (I won't say who it's for, lol).   I decided to make the same card in a variety of colours, and I used the 'Thinking of you' sentiment with a blank inside so the person I'm giving the set too can give these cards for a variety of occasions.  I also kept the design relatively simple so I wouldn't be making the set for days lol.


I started by choosing card stock colours and ink to match.  I stamped the ivy image in each colour on pieces of cream that had been corner rounded at the top and torn at the bottom.  


The sentiment was stamped at the bottom of the panel, the edges inked, and then treated with the cracked glass technique.  I  didn't start out thinking I was going to use this technique  so I was just using regular 80 lb card stock.  I used UTEE  to emboss,  and I usually use three coats for this technique, but I found that three coats was really too heavy.  Not only did three coats make the paper curl quite a bit (I don't mind a bit of curling, but this was more than I was comfortable with), some of the embossing flaked off after cracking.  I discovered that two coats of UTEE really worked best here.


I always love the result of this technique and this time is no different.  The intricate image on cream, the blended beige ink, and the crackle really made the panels look like old ceramic - the blue in particular reminds me of my grandmother's 'Blue Willow' dish set, even though the shade of blue isn't quite right. I love how the torn edge became almost translucent with this treatment.


Finally I added twine and a gemstone to each panel and adhered them to the card fronts with foam squares.


For the centre of each card I stamped the corner ivy images on inked cream panels and adhered.  I left lots of room for a handwritten sentiment.

Since I was making a gift set I included some premade envelopes and decided to make a box with the help of my Martha Stewart scoring board.


Sadly I forgot to write down the measurements of the card stock and scoring I used, but it was really easy with the score board.  I will definitely be making more of these boxes and I will post more detailed instructions in the future.


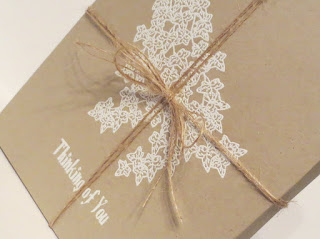
Because the cards themselves are so colourful yet simple I decided to make a simple kraft box with the same image and sentiment stamped on the lid and heat embossed in white.  


To echo the decoration on the cards I used twine to finish off the little gift box.  I love how this turned out so when I have more time in January I will probably try to come up with some similar sets.  I think they are a great gift for loved ones who may enjoy giving cards to their friends but don't make them themselves.  :)

You can see how much I have enjoyed this set so far, but this isn't the only amazing set this month.     Why not go to Mark's Finest Paper's Store and have a closer look at what is being offered this month!

Oh, and this is a blog hop after all so don't forget to check out what the rest of the DT has come up with!  The main blog has lots of inspiration as well.  Happy Hopping!  :)


I used the following supplies with my projects:

Card Stock:  Stampin' Up!  Dusty Durango, Rich Razzleberry, Garden Green, Very Vanilla, Gina K Designs In the Navy, Neenah Desert Storm.

Stamp:  Mark's Finest Papers Ivy & Blossoms

Ink:  Colorbox Fluid Chalk Ink Creamy Brown, Pumpkin Spice, Dark Peony, Blue Iris, Stampin' Up! Garden Green, Versamark Watermark Ink.

Embossing Powder:  Ranger Ultra Thick Embossing Enamel Clear, Martha Stewart Bright White

Embellishments:  Scrappin Supplies Rhinestones, May Arts Jute twine.

Envelopes:  Staples A2 size invitation envelopes.

Adhesive: Scotch ATG, foam squares, Scotch Quick Dry

Tools:  Paper trimmer, bone folder, Martha Stewart scoring board, Ranger Blending Tool, heat tool, freezer, We R Memory Keepers Corner Chomper.