Tuesday 26 June 2012

Awesome News!!!

They say good things come in threes, right?  I swear this is my last post today, lol. This past week I received two pieces of good news and I'm so excited I had to share!  :)

Firstly I found out that this card won a prize at Party Time Tuesdays!
Party Time Tuesdays


As this card was one of my most favourite that I've made recently I was really excited!  I will be receiving a prize from Crafty Sentiments Designs which makes this even more fun!

While that was a fun bit of news, the second bit was the best news.  I was chosen to be a member of the design team at Pause Dream Enjoy Challenges!!

Photobucket


I am soooo excited! I love the premise of the challenges.  Every week the challenge consists of a topic or question. There will be a different challenge every week of the year.  You can participate during the month to receive a prize, but if you would like to catch up the challenges are left open until the end of the year.  Some of the design team members are making a book of their projects so that they can document their crafty journey throughout the year.  Great idea, eh?!  My first post will be on July 6 but don't wait until then to visit, they have a great challenge going on right now asking you to use the first three things you grab in your craft room, or three things the same.  Since I'm not officially a member of the team yet I couldn't help but join in!  :)

Monday 25 June 2012

Woven Ribbon Cardfront - I love ribbon!

As you may have gathered from the name of this blog, I really love ribbon.  If you read my last post (or click here) you know I was lucky enough to be asked to write a tutorial based on this original card.  Of course, to do a tutorial I had to make a new card and this is what I came up with:


I started with the stamp set  "Relax a Bit" from Marks Finest Papers that I won from a Speedy Fox challenge a few weeks back.  I love this stamp set!  I collect teapots so it was the perfect addition to my stamp collection.  I thought that the Authentique 6x6 Gathering collection would go well with this set.  Once I decided on patterns I chose ribbons and card stock to coordinate. 

I cut, scored, and die cut all of the basic pieces, then heat embossed the images I wanted to use on the patterned paper in black.  This is the first time I paper pieced with embossing and I found it really easy to cut everything out as I could almost let the raised image guide my scissors. It also helped me stay in the lines when colouring.  I used my craft knife to cut out the handle of the teapot and the inside of the teabag string.


Once I had all of my elements ready I completed the woven ribbon panel.  I adhered the panel to the card front with Scotch ATG adhesive and glue dots.  Because the ribbon panel is quite heavy it is important to use a strong adhesive.  The die cut piece was foam taped over the top.


I added some faux stitching, adhered the teapot, added some twine, and Prima flowers.  I glued the teabag to the Prima flowers, and foam taped the sentiment at the bottom.  This card took some time to make, but I think it was worth it!


 Since the front had so much going on I kept the inside simple with just a stamped verse.  I love this quote!  This would be a great card for a pick-me-up.


Again, I made this card because Debbie from Friends of Speedy TV asked me to write this tutorial for them.  If  you haven't already, take some time to visit Friends of Speedy TV.  They have a great tutorial section among other fun things.  You won't regret you did!  :)

I used the following  supplies:

Cardstock:  Gina K Pure Luxury 120# Pure Ivory, Stampin' Up!  Very Vanilla.

Stamps:  Mark's Finest Papers Relax a Bit.

Ink:  Versamark Watermark Ink, Stampin' Up! Black Embossing Powder, Memento Tuxedo Black.

Markers:  Bic Mark Its Sunset Orange, Hot Aqua.  Black felt tip marker.

Ribbon:  American Crafts Premium Satin Ribbon.

Embellishments:  Prima Flowers Mellise Nature Garden,  Stampin' Up!  Basic Jewels Rhinestones.

Adhesive:  Scotch ATG, Stampin' Up|!  Sticky Strip, Zots, Quickie Glue Pen, foam squares.

Tools:  Paper trimmer, bone folder, scissors, Cuttlebug, Spellbinders Nestabilities Standard Circles Small, heat tool, Fiskars craft knife.


I am entering this card into the following challenges:
  1. Pause Dream Enjoy - #22 Use your favourite quote or verse.
  2. Papertake Weekly - Bingo! (Ribbon/ Free (Gems)/ Blooms)
  3. Allsorts - Any die will do
  4. Pile it On - Make your own embellishments
  5. Friends of Speedy TV Tutorial Time - Heat Embossing

Woven Ribbon - My first tutorial!

Remember this card I did a while back?  Well Debbie from Designing with DebbieMark's Finest Papers, and Friends of Speedy TV liked it so much she asked me to do a tutorial on how I created the background for the tutorial section of Friends of Speedy TV.  How exciting is that?!

I asked Debbie if it was ok if I posted my tutorial here, and since she was ok with that here it is!  I was thinking of starting a tutorial section on my blog anyway, so this will be post #1.  Thanks Debbie!  :)


Supplies needed:


Ribbon – Various shades of 3/8” width ribbon.  10 lengths cut to 5 ½” and 13 lengths cut to 4 ¼”.
Cardstock – Card base cut to standard A2 size – 5 ½” by 4 ¼”. Piece for card front cut to 5 ¼” by 4”, die cut with a circle or oval die.  Piece for woven panel cut to 4 7/8” by 3 5/8”
Adhesive – Sticky double sided adhesive.  I used Sticky Strip from Stampin’ Up!, but there are other brands that work just as well.  It is also a good idea to have some glue dots on hand when finishing.


Step 1:  Apply the sticky adhesive to all four sides of the smallest piece of cardstock.


Step 2:  Remove the adhesive liner from one short end of the panel.  Start adhering the longer pieces of ribbon making sure they are as close together as possible without overlapping.


Step 3:  Remove the adhesive liner from one long side of the panel and start adhering the shorter pieces of ribbon in the same manner as the previous step.  Make sure the first piece is up against the edge of the panel.  It may be necessary to overlap one of the pieces from the first side.


This is how your project should look so far:


Step 3:  Flip the panel over.  At the top of the panel weave the first short piece with the longer pieces of ribbon.  Stick the end to the adhesive on the backside of the card.  The easiest way to do this is to remove the liner as you go so that the panel doesn’t get stuck to anything you don’t want it to.


Step 4:  Continue with the remaining pieces of ribbon, alternating how each row is woven.


This how the back of the piece should look so far:


Step 5:  When you get to the bottom pull the ends of the long ribbons to help flatten the fabric you’ve created.  The ribbons may pucker a bit but this will add interest.


Step 6:  Flip over your piece and adhere the remaining ends.  If there are any pieces lifting from the adhesive that won’t stay stuck, you may wish to glue these down with glue dots.


This is how the back should look:


This is how the front should look:


Step 7:  Assemble your card.  Since the piece will be heavier than usual make sure you use a strong adhesive to adhere the panel to the card front.  Adhere the die-cut piece to the ribbon panel  with foam tape.


Step 8:  Decorate according to your preference.  Here is a close up of the finished panel assembled:


You can find my finished card here!!

By the way, if you haven't seen Friends of Speedy TV tutorial section, it is a great resource with tons of great techniques.  The site is free to join, and you may learn something you didn't already know!   I already linked to the site above but if you don't want to scroll back up you can find it here.  :)

Sparkly Butterflies - Craft Your Passion Challenge #116

So here it is, my fourth and final week as guest designer at Craft Your Passion Challenges.  I've really enjoyed this opportunity, and I'm so thankful to Craft Your Passion for having me!

This week the challenge is Things with Wings, and is being sponsored by Stitchy Bear Digital Stamps.  I got to chose a digital image to work with, and I love this Floppy Latte Design called Butterflies in the Grass.


Once my image was chosen I had the idea to use three colours of washi tape.  I decided on which colours I wanted to use, I thought three bright colours would be pretty and summery.  I printed the image on cream cardstock, heat set the image, and coloured it to match the shades of tape. I corner rounded the image and inked the edges with green.

I chose a cream cardstock base, and kraft to layer  After corner rounding the bottom of both pieces, I added green ink to both the card base and the layering piece.  At this point I adhered strips of tape, using two strips of each colour, layering them slightly when pressing them down. I made sure that when tearing the ends they were jagged for a bit of interest.

Matching shades of satin ribbon was layered over the washi tape and knotted.  This was a cheater knot, as I cut the longer piece just long enough to zot each end to the back, then tied a separate smaller piece to make the knot.  I like doing it this way because you save ribbon, and it is much easier to get the knot to lie the way you want it to.  I secured the knot in place with a Zot.

Once the ribbon was adhered I foam taped the image in place.  I added Sakura glitter pen to the lighter areas of the butterflies, and also outlined each butterfly.  I decided that this wasn't enough though, and finished the image off with some rhinestones.

I decided to make this a thank you card so inside I added some strips of tape, and a small corner rounded piece of kraft with the sentiment stamped on it in black.  I added a few more rhinestones to finish it off.

I used the following products:

Cardstock:  Stampin' Up! Very Vanilla, Crumb Cake.  Gina K Designs Pure Luxury 120# Pure Ivory.

Stamps:  Stitchy Bear Butterflies In the Grass.  Stampin' Up! Kindness Matters.

Markers:  Stampin' Up!  Stampin' Write Markers Certainly Celery, Orchid Opulence, Bashful Bue, not Quite Navy, Rose Red, Summer Sun, Regal Rose.  Sakura Gelly Roll Clear Stardust.

Ink:  Color Box Fluid Chalk Ink Olive Pastel.  Memories Black.

Embellishments:  My Minds Eye Indie Chic Paper Tape, American Crafts Statin Ribbon, Stampin' Up! Basic Jewels Rhinestones.

Adhesives:  Tombow Mono Permanent Adhesive Runner, Zots, foam squares.

Other Tools:  Paper trimmer, scissors, bone folder,  We R Memory Keepers Corner Chomper, artist sponge.


I'm entering into the following challenges:
  1. Deep Ocean - Welcome Summer
  2. Creative Card Crew - Easy as 1, 2, 3 - 1 image, 2 butterflies, 3 ribbons and washi tapes 
  3. Ladybug Crafts Ink - Double Trouble 
  4. Charisma Cardz - Summer

Friday 22 June 2012

Mustaches for Father's Day

Hi All!  Tonight I thought I'd share the card I made for our Dads for father's day. I'm late because I didn't want to post this before I mailed them and me being me I mailed them at the very last second.   I was originally going to make a card specific to each, but since they are all current or former 'mustache men', and I loved this card so much, they each got one.


I started with the stamps.  I was looking at stamps online when I was getting ready to make this card and I was thinking that I wished I had a mustache stamp or some patterned paper.  Then I thought, why don't I carve my own stamps?  Problem solved!


The stamps didn't turn out perfectly, but I think that's part of the charm.  Once I had the stamps, I started by choosing the card stock, some coordinating ink, and some Bazzill Basics newsprint paper that I must admit I've been 'saving' for a special occasion, lol.

On a piece of cream card stock I stamped a series of mustaches with the orange and beige inks, using the smaller stamps.  I cut all of the papers down to the size I wanted and inked the edges of everything with either shade of ink.

I stamped the larger mustache in black and cut it out.  I assembled the background panel, including the newsprint, added twine, and adhered it to the card front.  I assembled the smaller panel, added the handwritten tag and some mini brads, and adhered it to the card front with foam squares.  The big mustache was adhered with more foam squares.


For the center I just added an inked piece of cream matted with orange, and one of the smaller mustaches stamped in black in the corner.  Simple and lots of room for hand written sentiments. :)


I used the following supplies:

Cardstock:  Recollections Kraft, Stampin' Up! Dusty Durango, Very Vanilla, Basic Black.  Bazzill Basics Antique Newsprint.

Stamps:  Hand carved mustaches.

Ink:  Color Box Fluid Chalk Ink  Creamy Brown, Tangerine.

Adhesive:  Scotch ATG, foam squares.

Embellishments:  Recollections mini brads, hemp twine from stash.

Tools:  Paper trimmer, bone folder, scissors, sponge, Stampin' Up! Large Tag Punch.


I would like to enter the following challenges:
  1. Pause Dream Enjoy Challenges - Use 3 of something.  (3 mustache stamps, 3 ink colours, and I wrapped the twine 3 times around the card front).
  2. Fussy and Fancy Friday Challenges - Boy Attitude
  3. Simon Says Stamp and Show - A bit of brown

Monday 18 June 2012

A Waterfall Memo - Craft Your Passion Challenge #115

Wow, time flies!  Its already my third week guest designing with Craft Your Passion Challenges.  This week the challenge is Flips and Folds.  I immediately thought of a waterfall card.


These cards are really fun, and they look a lot more difficult than they actually are, but with that said its probably been years since I last made one and I had to Google the directions.  I found a helpful tutorial so rather than re-inventing the wheel you can find the tutorial I used here.

Before deciding on papers I chose the stamps to use.  Lucky for me, the sponsor of this week's challenge is Tiddly Inks and on their site I found the stamp set called "Type Me some Flower Wishes".  So cute!  I thought that Lily Bee Designs Memorandum paper set would work well with these images so I chose a few sheets,  then chose various shades of cardstock to coordinate.

I started with a sand coloured base sized at 5.5" by 4.25".  I chose a lighter shade of blue to use as the background, and black to mat the piece.  I dry embossed the blue sheet with my Cuttlebug, then used  the same shades to mat the squares of patterned paper I had cut to size.  Once everything was cut and inked I adhered everything according to the directions.


At this point I sized and printed the images I wanted to use, cut them out, and inked the edges to coordinate with the papers. I adhered them on the squares, and I punched two holes at the bottom of the long strip.  Some black hemp twine was tied through the holes to make a pull.  Lastly I added some rhinestones, and some Basic Grey typewriter key embellishments that I thought worked perfectly.


The typewriter keys were originally paper clips, but I couldn't make them work as they were.  Since I have a pair of Tim Holtz Tonic scissors I thought I would try to snip the clips off and it worked - the scissors cut through the thin metal almost like butter! 

Waterfall cards are so fun to make and fun to receive.  While there are quite a few steps you must follow in order to make the card work, it is definitely worth it to send a loved one such an impressive card.  Now I can't wait to see what everyone else comes up with!  :)

I used the following products for this card:

Cardstock:  Stampin' Up! Sahara Sand, Whisper White, Baja Breeze, Basic Black.  Lily Bee Design Memorandum 6x6 Tiny Tablet.

Digital Stamps:  Tiddy Inks Type Me Some Flowery Images.

Ink:  Color Box Fluid Chalk Ink Lipstick Red, Charcoal.

Embellishments:  Stampin' Up! Basic Jewels Rhinestones, Basic Grey Decorative paper Clips, Recollections mini brads, black hemp twine from stash.

Adhesives:  Stampin' Up! Sticky Strip, Tombow Mono Permanent Adhesive runner, Zots.

Other Tools:  Paper trimmer, scissors, Tim Holtz Tonic scissors, bone folder, Cuttlebug, Cuttlebug embossing folder Seeing Spots.


I am entering into the following challenges:
  1. The Pretty Little Ribbon - Lots of Layers
  2. The Paper Shelter - Anything Goes
  3. Speedy Fox - Vintage

Sunday 17 June 2012

Daddy's Day


Happy Father's day to all the dads out there!  I made this Father's Day card a while ago but I didn't want my husband to catch sight of it too early!


Can you believe that there is no stamping here?  That almost never happens!  I had gotten some Authentique paper bundles a month or more ago from Scrapbook Steals, but  I almost hid it away because the papers are so luxurious I didn't want to ruin them.  After I went through some of the cute die cuts and sentiments that came with the pack I changed my mind!

I started by choosing which die cuts, sentiments, and letter stickers I wanted to use, then chose some coordinating patterned papers and card stock.  I used my sanding block to remove all of the little tags that remain when you punch out die cuts.  Once all of the paper elements were cut I corner rounded everything except the sentiment.  I banner cut the ends of the sentiment, then inked everything, including the letter stickers with navy ink.  I adhered the background papers, added some hemp twine in a haphazard way and adhered this panel to the card front.

Once I matted the main image I foam taped it over the hemp twine, and decided the bow needed something.  I pulled out my heart punch and adhered coordinating hearts over the knot. The letter stickers were arranged where I wanted them and I foam taped the sentiment just below.


For the center of the card I added white cardstock, some patterned scraps, and some patterned hearts.  I added the word stickers in a haphazard way because the card was to be from my son and I thought it looked more fun that way.

I love how this turned out.  It was definitely out of my comfort zone because I didn't use any stamps.  Using this coordinating pack of goodies, however, made it so much easer to pull off.  Definitely something I will come back to in the future!

I used the following items:

Cardstock: Stampin" Up! Night of Navy, Whisper White.  Authentique 6x6 Bundle Collection Loyal.

Ink:  Stampin' Up! Night of Navy.

Embellishments:  Authentique Diction word stickers, Petite Type Circles, Expressions from Gathering Collection, Icons from Miracle Boy Collection..

Adhesive:  Scotch ATG, foam squares, Quickie Glue Pen.

Tools:  Paper trimmer, bone folder, scissors, We R Memory Keepers Corner Chomper, Sponge, Recollections heart punch, Tim Holtz sanding block.


I am entering the following challenges:
  1. The Pink Elephant - Masculine
  2. Friends of Speedy TV - Father's Day
  3. Charisma Cardz - Male Cards
  4. Fussy and Fancy Friday - Boy Attitude
  5. Use it Tuesday - All about Dad  (Authentique paper bundle)

A Fancy Cup of Tea

I won a new stamp set a few weeks ago from the Speedy Fox Challenge - you can see my original card that won here - called "Relax a Bit:".  Its really cute with a teapot and a teacup, which is great because I collect teapots. :)  I wasn't sure what  to do with it at first so I just sat down with the set, some inks and papers, and this is the card I came up with:


It is not the colour scheme I usually go for, but I think it turned out ok.  I started with a My Minds Eye 6x6 pad and chose some pinks patterns, and som patterns with some teal shades. I decided to use the gingham pattern as the background and made all of the other decisoins from there. 

Once everthing was trimmed and die cut to size I stamped the images I watned in white and die cut them with my Spellbinders circles.  I also embossed the circles with the tan Spellbinders mat and inked all components with brown inks.  I adhered the background papers and added twine, then matted the stamped images and adhered them with foam tape for dimentsion.  This panel was adhered to the card front.  The circles went over the edge a bit so I trimmed with my sissors, and I decided that the card needed a bit more sparkle.  I added some rhinestones to the images and the sparkly multifacited gems I had gotten at Micheals on sale.  All done!

This was a fun card to make because I didn't really have an end result in mind so I just played with it until I was done.  I think it is a fun result! 

I used the following supplies:

Cardstock: Stampin' Up!  Crumb Cake, Whisper White.  My Minds Eye Miss Caroline Dolled Up 6x6 pad.

Stamps:  Mark's Finest Papers Relax a Bit

Ink:  Color Box Fluid Chalk Ink Chestnut Roan, Creamy Brown

Embellishments:  We R Memory Keepers Baker's Twine, Recollections Gemstone Stickers, rhinestones from stash.

Adhesives:  Scotch ATG, foam squares.

Tools:  Paper trimmer, scissors, bone folder, Cuttlebug, Spellbinders Nestabilities Standard Circles Small and Large, sponge.


I am entering into the following challenges:
  1.  Simon Says Stamp and Show - Anything Goes 
  2. The Paper Shelter - Anything Goes 
  3. Moving Along with the Times - Lets Get Krafty 

I might be a Spectrum Noir convert...

Hi Everyone,

I came across a blog hop that the Spectrum Noir Blog is having showcasing their design team and their markers.  I haven't delved into alcohol markers too much, mostly because of cost, and also because its slightly intimidating, but the Spectrum Noir teammates have made me think that maybe I can do it too. Since the markers are much more inexpensive than Copics they are much more economical and  I can build up my collection much more quickly. 

They are also having a contest - if you go through the blog hop then comment on the main post back on the Spectrum Noir page you get entered into a contest to win a full set of 72 markers!  I am certainly doing that, but in addition if you post their blinkie on your page then you get put into another draw for a gift certificate!  Since I am pretty much sold on their product I thought, what the heck!?  :)   So here it is:


Let me know what you guys think.  I will be back later with another card.  :)

Saturday 16 June 2012

Christmas Cards #1 & 2

I've finally gotten a chance to blog a bit so I thought I would share the first of my Christmas cards.  I know it seems early but I figure the earlier I start the better.  We'll see if this worked out in December, lol.


I started with the patterned paper.  Since I'm not quite in a Christmas-y mood yet I chose the patterns that where the least Christmas-y, lol.  I made multiples of these and I didn't have quite enough of the ornament pattern, so I chose the snowflake pattern as well.

Once I chose coordinating cardstock, I made card bases that were 4.5" square so they fit in an A2 envelope to avoid extra postage. I wanted to do something a bit different so I decided to make a cut-out card.  I used my circle dies to cut circles in the centres of the card fronts and the layers, and corner rounded all components.  I adhered the patterned panel to the white, added twine, added some button brads, and adhered the panel to the card front.  I was going to leave the white border plain but decided it needed more so I added some black faux-stitching with the aid of a ruler.

My favourite tool when making Christmas and holiday cards is my snowflake punch, so of course I pulled that out of its hibernation.  I sprayed some white cardstock with shades of  frosty looking spray mists and when it was dry I  punched away.  I adhered three snowflakes to the bottom corner of each card, added some rhinestones and the card front was done.

For the center I just added a square of white and stamped the sentiment in the middle with Versamark then heat embossed with silver.  Quick and easy!

I love how these cards turned out!


I used the following supplies:

Cardstock:  Stampin' Up! Baja Breeze, Crumb Cake, Whisper White.  Echo Park Season's Greetings 6x6 Paper Pad.

Stamp Set:  Stampin' Up! Christmas Punch

Ink: Versamark Watermark Ink, Stampin' Up! Embossing Powder Silver

Mists:  Tattered Angels Glimmer Mist Frost, Glacier

Embellishments:  We R Memory Keepers Baker's Twine, generic rhinestones from stash.

Adhesive:  Scotch ATG

Tools:  Paper trimmer, bone folder, scissors, Cuttlebug, Spellbinders Nestabilities Standard circles large and small, black felt tip pen.


I will enter this into the following challenges:
  1. The Pretty Little Ribbon - Lots of Layers
  2. Deep Ocean - Stitching faux or real
  3. Simon Says Stamp and Show - Anything Goes
  4. The Paper Shelter - Anything Goes
  5. Moving Along with the Times - Lets get krafty
  6. My Mums Craft Shop - Clean and simple
  7. Daring Cardmakers - A hole in one

Monday 11 June 2012

Pretty Hummingbirds - Craft Your Passion Challenge #114

Hi everyone!  I can't believe its been a whole week since I posted last.  I've been crafting, just haven't had a chance to post so stay tuned for that sometime this week.  In the meantime, its time for my second challenge as guest design team member with Craft Your Passion Challenges.   The theme for challenge #114 is Anything Goes which is always fun.  The challenge is being sponsored by My Heart Pieces so I got to choose one of their lovely images for my card.


I started with the image called "Flower".  I love the birds and I thought it might work well with the papers in  Kaiser Craft's 6.5x6.5  pad called "Bonjour". The papers have lots of pastel and creamy shades, and are have lots of imagery that I find really soft and pretty.

I decided to colour the image before choosing the exact patterns to use.  I kept the colours light and toned down the brightness by using a touch of gray. I chose the three patterns that I thought worked best with the image.  I particularly liked the brown background as the cream postmarks are actually embossed on the paper.


I chose some green for the card base, and some kraft to mat the patterns.  I inked the edges of the brown pattern and the kraft with brown ink, and tore the top edge of the green and pink patterns.  The patterns were adhered to the kraft and I added some hemp twine and cream seam binding. Once the image was adhered with foam squares over the ribbon, I thought I was going to be finished but I felt something else was needed.  I decided to add some rhinestones to the centers of the flowers.  All done!


For the inside, I decided not to use a sentiment but I still thought it deserved some decoration, so I added an inked piece of cream cardstock, a couple of die cuts from the paper pad, and some torn scraps.


I love these colours together.  I think anyone would love to receive a note inside this card, don't you?


I used the following products:

Cardstock:  Stampin' Up! Certainly Celery, Crumb Cake, Very Vanilla.  Gina K Designs Pure Luxury 120# Pure Ivory.  Kaiser Craft 6.5" Paper Pad Bonjour.

Stamp:  My Heart Pieces Flower.

Markers:  Bic Mark Its Margarita Green, Oceanview Blue, Peach Parfait.  Copic R20, W3, 0.

Ink:  Color Box Fluid Chalk Ink Chestnut Roan.

Embellishments:  Ribbon Carousel Croquette Beige Vintage Seam Binding, natural hemp twine from my stash. Stampin' Up! Basic Jewels Rhinestones.

Adhesive:  Scotch Advance Tape Glider adhesive, Zots, foam squares.

Tools:  Paper trimmer, scissors, We R Memory Keepers Corner Chomper, Tim Holtz Tonic distressing tool.


I am entering this card into the following challenges:
  1. Really Reasonable Ribbon - Flowers and Ribbon 
  2. The Pretty Little Ribbon - Lots of Layers 
  3. Papertake Weekly - Anything Goes 
  4. The Paper Shelter - Going Dottie 
  5. Allsorts - Ice Cream Colours 
  6. Simon Says Stamp - Diamond Jubilee

Monday 4 June 2012

'Bee' Happy - Craft Your Passion Challenge #113

I'm so exited - this is my first post for Craft Your Passion as a Guest Design Team member for June!

For this week, the challenge was to use chevrons.  An Inspiration photo was also provided:


Very pretty!  And how lucky I was that I have the perfect washi tape for such a project - from My Minds Eye Indie Chic collection.  Here is what I came up with:


Once I decided on the pattern, I had to decide on an image.  Since I got to choose from images provided by the sponsor of this week's challenge Delicious Doodles the most difficult part was just picking one (I have never been known to be a decisive person).  After some consideration I chose "Bee and Flower".  So cute!

I started with some kraft cardstock cut and scored to a standard A2 size. After corner rounding the bottom corners I added my tissue tape vertically strip by strip, matching the pattern as I went along, kind of like you would match up wall paper.  I left the bottom of each strip jagged and uneven as I thought this would allow for some interest.  For the same reason I lifted the strips on either end and tore them lengthwise before replacing them in their alloted spaces.  To add contrast I placed two strips of yellow tape with polka dots horizontally about a third of the way from the bottom.  Since the tape is semi-transparent you can still see a bit of the chevron through the yellow. I really like the effect.

Since this was my first card for Craft Your Passion I wanted to do something a little different and special, so I pulled some Stampin' Up! transparencies from my stash.  I've been hoarding these sheets forever but I thought they would be fun here, particularly the one with foliage on it.  To hide the adhesive I first attached the sheet to the card with Zots placed at either end of the yellow tape, since I knew I  would be putting ribbon or twine over that spot.  After the rest of the elements were added I carefully lifted the transparency and added more Zots under each so that the sheet was more secure.


I added some baker's twine and placed some Prima flowers over the foliage.  I heat embossed the sentiment on a banner cut strip of kraft and  corner rounded the opposite end.  The sentiment was adhered with foam squares.  Once this was done it was time to work with my image.


I was slightly nervous about this part as I have rarely worked with digi images, but I'm all for learning new things so I googled some instructions and got to work.  I printed the image on 120# cardstock and heat set it to minimize smudging.  I then coloured the image and added some Sakura glitter pen.  My original intention was to only add glitter to the wings, but then I added some to the antennae, then I thought some might look nice around the face, and then before I knew it, all of the black was covered in glitter.  Thats ok, I like glitter!  Once my image was finished I cut it out with some detail scissors and placed on my card with foam squares.


On the inside of the card I heat embossed the matching sentiment and added a touch of glitter pen to the letters.  Since the cardfront is fairly busy (like a bee maybe, lol) I decided that further decoration wasn't necessary.


This was a really fun card to make.  I love the combination of the chevrons with the flowers and the bakers twine, and I love the shine of the transparency, and the leaves under the flowers.  Best of all, I really love the little bee - she's so cute!  I think it is fair to say that I am over my fear of digi images - I foresee more projects with them in the future!  :)


I used the following products:

Cardstock:  Stampin' Up!  Crumb Cake.  Gina K Designs Pure Luxury 120# Pure White.

Stamps: Delicious Doodles Bee and Flower (digi), Stampin' Up! Petite Pairs.

Ink:  Versamark Watermark Ink, Martha Stewart Bright White Embossing Powder.

Markers:  Bic Mark Its Fandango Pink, Sunset Orange, Pink Flamingo Peach Parfait, Yellow Blaze, Forest Green.  Copic W5, W3.

Embellishments:  My Minds Eye Indie Chic Paper Tape, Prima Flowers Mellisse Nature Garden, We R Memory Keepers Sew Easy Bakers Twine Blueberry, Sakura Gelly Roll Clear Stardust. Stampin' Up! Clearly Thanks printed window sheets.

Adhesive:  Zots, Foam Squares.

Other tools:  Paper Trimmer, scissors, bone folder We R Memory Keeper Corner Chomper.


I am also entering the following challenges:
  1. The Paper Shelter - Vintage or shabby chic
  2. Charisma Cardz - Bling
  3. Simon Says Stamp - Anything Goes


Sunday 3 June 2012

Royal Celebrations

Welcome to post #50!  When I started this blog 50 posts seemed like an awful big number, lol.  :)  My 50th post deserves a celebration of some sort, don't you think?  Since it is the Queen's Diamond Jubilee this weekend I was inspired to make this card:


I started with a lovely paper pad from Authentique - I love these colours!  Totally not something I would have paired on my own but so pretty.  And then i decided to work with a Lost & Found Two stamp set from My Mind's Eye.  Honestly when I got the set I thought to myself that I may never use the crown stamps.  I'm glad I was wrong!

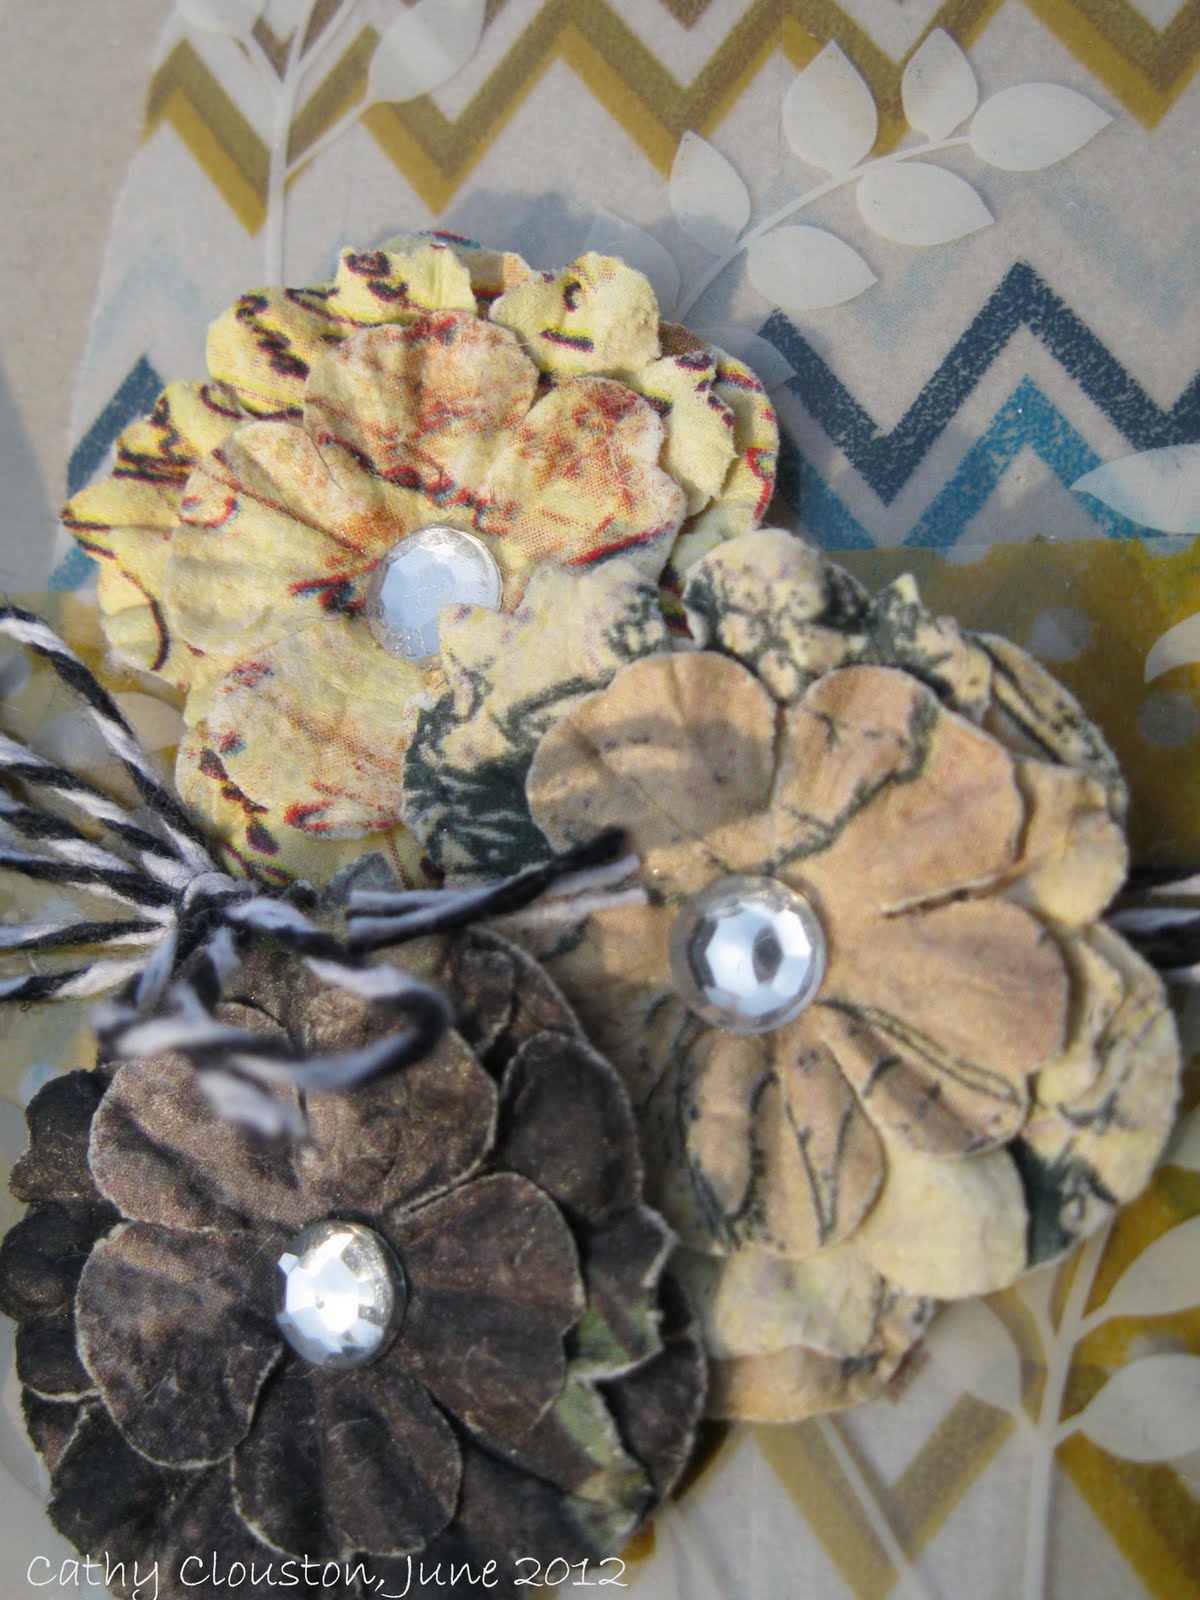
I chose some card stock to go with the paper pad, and since I wanted to make more crumpled flowers I chose several sheet that I liked.  I punched the bird and cage with my tag punch out of one sheet, and cut various sizes of circles out of the remaining of that sheet and the rest of the sheets I had chosen. I had decided already to go with various sizes of circles instead of just one size this time.  I sprayed the circles with water, crumpled them up and set them aside.


I cut and scored my card base, and cut another piece of gray to layer on top that I embossed with my Cuttlebug.  I then cut all of the sizes of paper I wanted and inked them all with either cream or gray ink.  I adhered the embossed piece to the card front with foam squares, and matted the argyle print with yellow and cream.  I added some gray ribbon, some yellow bakers twine to this panel and tied bows.  I had attached the tags to the twine before tying, but secured them down with more foam squares.  The panel was adhered to the embossed piece with more foam squares.

For the sentiment I decided I wanted to layer the stamps, so I first stamped the doily in gray, and sponged a bit of cream ink over the center to help the sentiment stand out.  After using my embossing buddy I embossed the sentiment in black over the doily and embossed the crown images in silver.  I was going to add some glitter at this point, but I decided in the end it wasn't necessary.  I adhered the image panel to a gray mat, added some mini brads and adhered this with foam squares over the ribbon.


At this point I went back to my crumpled circles and carefully opened them up.  Because the paper is thicker than what I usually use for this technique some of the pieces were still damp so I finished the drying with my heat gun.  I've found a tip when doing this - I put all of the pieces in a heat proof ramekin and then point my heat tool in the dish, shielding the top with my hand.  This helps the bits from flying all over my table and the walls of the dish reflect some of the heat so that the pieces dry faster.  Just be careful  because its easy to burn a stray finger, lol.


I assembled the flowers with a white button brad this time, and adhered a rhinestone to the center of each brad.  The flowers were inked with some gray, and I adhered them to the card front.  This card is very layery (the technical term, lol)!


The center was decorated with a matted piece of cream stamped with my favourite birthday sentiment, and a scrap of patterned paper. 


I love this card, the images, the patterns, and the colours.  My favourite part though is the flowers.  I love these flowers so much I think I may do a post just on those. I love making them and I love how they look, not to mention you never have to worry about not having embellishments to specifically match your project.  Stay tuned, such a post may be coming in the future!

I used the following products:

Cardstock:  Stampin' Up! Basic Gray, Very Vanilla,  Crushed Curry.  Authentique 6x6 Collection: Blissful.

Stamps:  Stampin' Up!  On Your Birthday.  My Mind's Eye Lost & Found Two Rosy "everything" stamp set.

Ink:  Color Box Fluid Chalk Ink Charcoal, Alabaster.  Stampin' Up! Going Gray. Memories Black.  Versamark Watermark Ink.  Stampin' Up! Embossing Powder Black, Silver.

Ribbon:  We R Memory Keepers Bakers Twine Lemonade, gray satin ribbon from stash.

Embellishments:  Recollections brads, Stampin' Up!  Basic Jewels Rhinestones.

Adhesives:  Scotch ATG, Zots, Foam squares.

Tools:  Paper trimmer, scissors, Cuttlebug, Spellbinders Nestablities Standard Circles Large and Small, Cuttlebug Scrollwork embossing folder, We R Memory Keeper brad setter, sponge, Stamp a ma jig.


I will enter this card into the following challenges:
  1. Deep Ocean - Swirls 
  2. Crafty Cardmakers - Distress it 
  3. Party Time Tuesday - Anything goes 
  4. The Paper Shelter - Vintage or Shabby Chic
  5. The Cuttlebug Spot - Fit for a Queen
  6. Really Reasonable Ribbon - Flowers and Ribbon
  7. Fussy and Fancy Friday - Swirls and Flourishes
  8. Charisma Cardz  - Bling
  9. Simon Says Stamp - Anything Goes
  10. Lets Ink It Up -  Use your favourite embellishments (handmade paper flowers)