Tuesday, 15 January 2013

MFP Featured Designer and Scrunchie Flower Card

Hi Everyone! With the blog hop going on it is a very exciting week for us Design Team members at Mark's Finest Papers, and on top of that I'm the featured designer on the blog this week!  How exciting is that?!


When featured each designer comes up with a tutorial.  Since I love them so much I decided to put together a tutorial for scrunchie flowers which you can find here.  These are really easy to put together and can add a lot to your projects.  This is the project that resulted once I finished the tutorial:


Once I had all of my flowers made the card was fairly simple.  I decided to go with a kraft card base to go along with the flowers, and kraft panel with rounded corners.  I stamped the image from Ivy & Blossoms over the entire main panel and foam taped the panel to the card base.


I stamped the sentiment on a banner strip and added glitter pen.  The last touch was to add a bow.  The centre was kept simple by just stamping another sentiment.


I love making these flowers, and now you can too!  Enjoy!  :)


I used the following supplies to construct my card:

Card Stock:  Neenah Desert Storm

Stamps:  Marks Finest Papers Ivy & Blossoms

Ink:  Colorbox Fluid Chalk Ink Chestnut Roan

Embellishments:  Ribbon from stash,  Sakura Gelly Roll Clear Star, handmade scrunchie flowers.

Adhesive:  Foam tape, glue dots, Scotch Quick Dry.

Tools:  Paper trimmer, bone folder, scissors, Martha Stewart scoring board, We R Memory Keepers Corner Chomper.

Scrunchie Flower Tutorial

Scrunchie flowers are a fun an easy embellishment you can use on cards, scrapbook pages, gifts, and anything your imagination can come up with!  I like to make a bunch of these at one time so that they are ready to go when I am creating my projects. I bet when you see how easy these are you will too!

 Supplies needed:


Paper – I like to use thin kraft parcel paper from roll, but any paper will do.  Just keep in mind the thicker the paper the less layers you will be able to use.   In addition to parcel paper, this technique works really well with newsprint and book pages.

·       Circle dies or punches.

·        Water bottle

·       Embellishments – I like to use self adhesive gemstones but you can use larger decorated brads or any kind of embellishment you like.

·       Mini brads – if you use a decorated brad you can skip the mini brads.

·       Liquid glue (optional).  I like Scotch Quick Dry.

·       Heat proof dish (optional).

·       Heat tool (optional).

·       Craft pick.


Step 1:  If using thin paper, fold several times so that you can punch or cut several circles at once.  If you are using thicker paper you may wish to skip this step.


Step 2:  Die cut or punch several circles.  I used eight circles for each of my flowers but the thicker the paper the less layers you need to use.  When using patterned paper I usually use four or five layers. That said, the bigger you make your circles the more layers you can probably get away with. 


 Please excuse all of the paper dust on my well loved Cuttlebug! I am cutting several sizes of circles here as I wanted to make several sizes of flowers.  I use the same size circle for each layer of my flowers.


Step 3:  Spread the cut circles out on your work surface and spray the heck out of them with your water bottle.  You want them to be very wet. 


When you see the finished project you may think that you can skip this step, but the wetting really helps the paper to form a nicely shaped flower in the end.  Trust me, it will be worth it!


Step 4:  Drag the circles around your work surface into any puddles of water remaining to make sure they are thoroughly soaked.  Gather them up into a pile.


Step 5:  Scrunch up each circle into a tight wad.  They look almost like spit balls only less yucky, lol. 


Step 6:  You can let these wads dry on their own, if this is your preference skip to step 8. If you are impatient like me on the other hand, place all of the paper balls into your heat proof dish.  I find this is the easiest way to keep them contained while drying.


Step 7:  Use your heat tool to dry the paper wads.  If you find they tend to fly out of your dish, use a scrap piece of paper to shield the opening of the dish.  Don’t use your hand as this is a really easy way to get burned (guess how I know).


Step 8:  Carefully unfold the paper wads.  Don’t flatten them too much.


If you find the circles are still damp in the middle you may wish to put them back in the heat proof dish and use your heat gun again. 


Step 9:  Stack the circles.  Again, mine are 8 layers thick, but you may wish to experiment to find out what you like best.  Try to line up the edges as best you can, but as the circles are crinkly this can be difficult so don’t worry if it’s not perfect.


Step 10: Use your craft pick to poke a hole in the centre of your circle stack.


Step 11:  Add a mini brad, or a decorated brad if that is what you would like to use.


Step 12:  Scrunch up each layer with your finger tips.  I try to scrunch each layer separately as they tend to stick together if you don’t.


At this point you can always add a little ink or mist.  If I am making a bunch, I will often stop here so that I can decide on ink and embellishment once I am actually finishing my project.  I usually keep a big bunch of plain flowers in a plastic zipper bag in my embellishment drawer.


Step 13:  If you are using self adhesive gems, add yours to the centre of the flower.  You may wish to add a bit of glue to make sure it stays in place.


Step 14:  You may have flattened your flower a bit when adding the center so this would be a good time to ‘re-scrunch’ the petals.


All done!   

See how easy that was?  I broke the process down into a lot of steps but once you get going it really doesn't take much time.  In fact, I cut a bunch of circles in the beginning of this tutorial with the intent to save most of the flowers for a later date, but once I got them done I decided to embellish them all: 


Click here to see my finished project.  I hope you enjoy making these flowers!  :)

MFP Blog Hop Day #1 Fantastic Dogs

Welcome to Mark's Finest Papers January Blog Hop!

 This Month’s New Stamp Set Releases Are:
Fantastic Dogs Featured January 15 (Thats today!)
No Sour Grapes Featured January 16
In My Den Featured January 17
Love, Love, Love Featured January 18

Please hop along with us!  You have a chance to win one of the above stamp sets!  Just comment on the following blogs (don’t forget this one), each day for more chances to win!  (You do NOT have to comment on all the blogs each day.  The names are drawn randomly)  All four winners will be announced on January 19, 2013 on the Mark’s Finest Papers blog.  You can go back and comment if you missed a day (HINT:  The more you comment, the more chances you have to win.  Comments on the MFP count twice!)  The deadline for commenting is 11PM EST (12AM ATL) on Friday January 18, 2013.

Happy New Year!!!  Welcome to the first blog hop of 2013!  We are so excited to share the great stamp sets we are releasing this month and in the months to come!


The mini stamp set we have for you this month is called “Not so Ugly”.


The special extra stamp set we have for you this month is called “Oh Baby”.


Today's set is a cute one called "Fantastic Dogs".


This set was really fun to work with and I've come up with two cards to share.  Here is the first:


I love those floppy ears!  I started by stamping on water colour paper and water colouring with water based markers.  I then chose papers, and inked the edges of the image to coordinate.


I trimmed the patterns down, inked the edges and adhered the main panel together.  I added ribbon, adhered the panel to the card base and added the image with foam tape.


I stamped the sentiment on a scrap of cream banner cut and inked with grey.  It was also foam taped to the card front.


If you follow my blog at all you know I love rhinestones and I did not skip them with this card.  Lots of rhinestones for lots of sparkle!  


As I've been doing with most of my cards lately I left the centre without sentiment so that I can use it for any holiday  A sentiment can always be added later.   I love how this card turned out, the argyle and the damask prints are so pretty together.

I would like to enter my card into the following challenges:
  1. Pause Dream Enjoy - Use Ribbon
  2. Partytime Tuesday -  Sparkle, Glitter, and Shine


My second card is a bit more simple:


I water coloured the image in the same manner as with the first card, but that's pretty much where the similarities end.  I chose a kraft card base and dry embossed a kraft panel.  After inking and distressing the edges I added some twill tape and foam taped the panel to the card base.


Once I inked the edges of the image to coordinate with the kraft paper, and then I stamped the word collage stamp and the sentiment on cream card stock.  I trimmed them both out and inked the edges with more creamy brown.


I adhered the word collage directly to the card base and layered the sentiment and image with more foam tape.  Some twine knots finished the card off.

I would like to enter this card into the following challenges:
  1. Paper Playtime - Pets
  2. One Crazy Stamper - Anything Goes

I love this stamp set, it's really cute and the images are fun to colour.  But this isn't the only great set this month, why not check out the Mark's Finest Papers store to see their wide selection of stamps, including the ones from this month.  Before you do that though, don't forget to hop along to the rest of the DT and see what great projects they have to show you:


I used the following supplies with my cards:

Card #1

Card Stock:    Gina K Designs Onyx Black, Authentique Blissful 6x6 paper pad, Stampin' Up!  Watercolour paper, Very Vanilla.

Stamps:  Mark's Finest Papers Fantastic Dogs

Ink:  Staz On Jet Black, Stampin' Up! Going Grey, Versafine Onyx Black.

Markers:  Stampin' Up! Soft Suede, Close to Cocoa, Creamy Caramel.

Embellishments:  May Arts Seam Binding, Recollections Rhinestones

Adhesive:  Scotch ATG, foam tape, glue dots.

Tools:  Paper trimmer, bone folder, scissors, Martha Stewart scoring board, Ranger Blending tool, waterbrush.


Card #2

Card Stock:  Stampin' Up! Watercolour paper, Very Vanilla, Neenah Desert Storm

Stamps:  Mark's Finest Papers Fantastic Dogs

Ink:  Staz On Jet Black, Versafine Onyx Black, Colourbox Fluid Chalk Ink Creamy Brown

Markers:  Stampin' Up!  Close to Cocoa, Chocolate Chip.

Embellishments:  Stampin' Up!  Twill Tape, May Arts Jute Twine.

Adhesive:  Scotch ATG, foam tape, glue dots.

Embossing Folder:  Sizzix Tim Holtz Checkerboard.

Tools:  Paper trimmer, bone folder, scissors, Martha Stewart scoring board, Tonic distressing tool, Ranger Blending Tool, Cuttlebug.

Monday, 14 January 2013

Mark's Finest Papers January Sneak Peak!

Hi Everyone!  I can't believe its time for another release of stamps at Mark's Finest Papers but never the less here we are!  Today some of us DT members are showing you the mini set and extra set that is being released this month.

The mini set is a cute one called "Not So Ugly":


I think this would be a great set to make a 'pick me up' card for a friend or loved one.  This is what I came up with:


The swan made me think of elegance so I decided to stick with a black and white theme.  I first stamped the image on white card stock and trimmed it out.  I only added colour to the beak.  I wanted the black part of the beak to sweep more toward the eye like a real swan, so I added a touch more black with a marker.


With the swan image finished I chose coordinating patterns and a card base, trimmed everything down, adhered it together and added some ribbon.  The swan was foam taped over the ribbon.  I stamped the sentiment, banner cut the ends and adhered it with foam tape slightly thicker than that used with the swan.


Finally I added rhinestones randomly across the front, and on the swan's feathers.  For the centre I used a similar pattern, and white card stock matted with black.  I stamped another sentiment on the white panel.


I would like to enter this card into the following challenges:

  1. One Crazy Stamper - Anything Goes
  2. Pause Dream Enjoy - Use Ribbon
  3. Songbird Challenges - Black + One Other Colour

The second set I'm showing you today is the extra set called "Oh Baby".  Who doesn't need a baby themed stamp set in their stash?  It has some really cute images and sentiments:


Here is what I came up with:


I was lucky enough to receive a Cricut Mini from my husband for Christmas.  I didn't even ask for one, he just said that when he saw it he thought I would think it's fun. He's a smart guy.  :)  When I made this card I decided to use one of the free images that comes with the software.


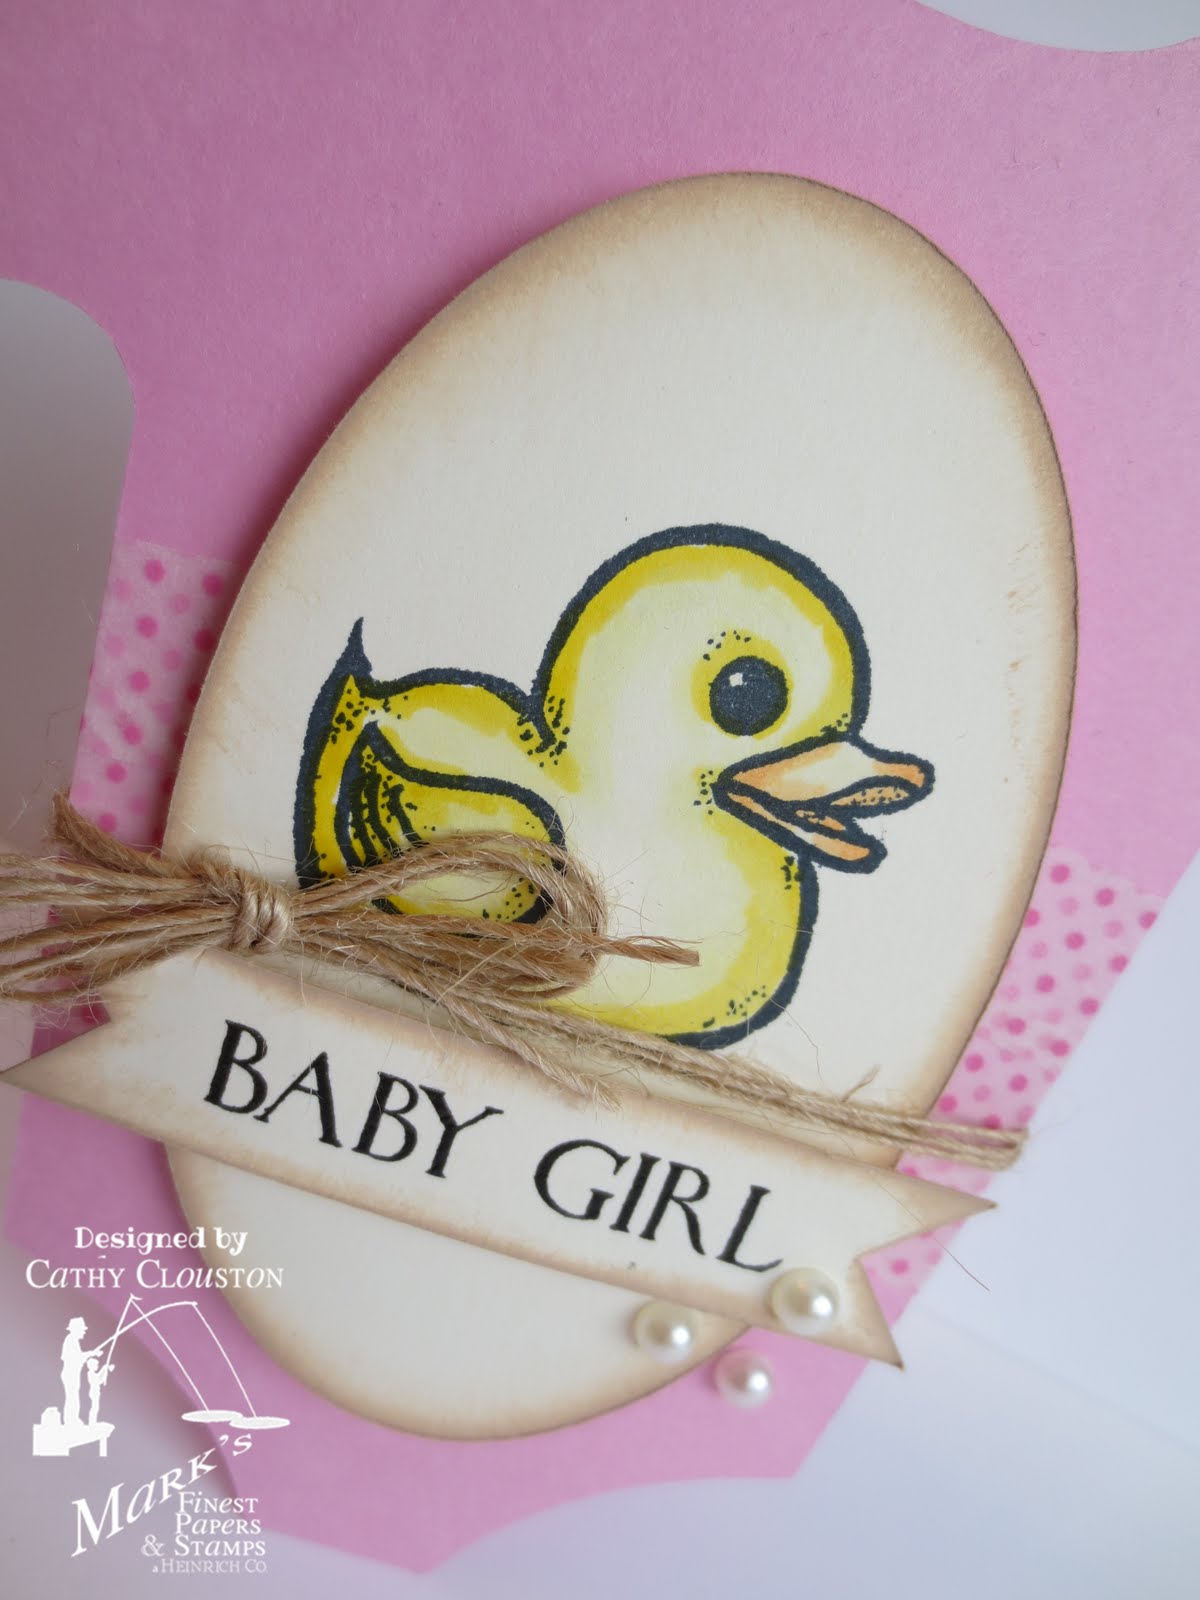
I cut the card by bringing up two onesie images in the Cricut Craftroom software, flipping one image 180 degrees and welding the images at the shoulder.  It was really easy to cut one card in pink and one in blue.  I also cut two ovals from cream card stock with the machine.


I stamped the duckie images on the ovals and coloured them using alcohol markers and a Copic Blender.  I didn't want the images to be completely saturated with colour, so I chose to just outline the images with my marker and blend with the blender pen.  It didn't turn out quite as blended as I wanted, but I like the final result.  It kind of reminds me of images in a vintage story book.


I inked the edges of the oval, and stamped sentiments on inked cream scraps with banner cut ends. I added coordinating washi tape to each card and adhered the ovals with foam tape.  Twine and the sentiments were added over the ovals, and a few pearls.  Two smaller pearls were added to one shoulder to look like buttons.


One great things about clear stamps is that you can cut them apart if you need to.  Do I hear a gasp?   Lol, I know it sounds like a strange thing to do to your stamps, but it is a great way to get more use out of the stamps you have. They easily trim apart, and if you want to use them together again you simply reassemble on your stamping block.  Easy peasy!


I bring this up because I cut apart one of the stamps to use in the centre of the card.  I originally was going to use the 'Baby in the tub' verse in its entirety, but it didn't quite fit the onesie shape.  I really liked the sentiment though, so I cut the 'Little Treasure' saying apart from the bottom and heat embossed it in the centre of each. I really like the result.

What do you think?  Do you love these sets as much as I do?  If so check back tomorrow to see the rest of the sets being released this month.  You won't be disappointed!


I would like to enter these cards into the following challenges:

  1. Allsorts - Dies and Punches
  2. Creative Corner Challenges - Cute as a button
  3. Papertake Weekly - Happy New


I used the following supplies on my cards:

Card Using "Not So Ugly":

Card Stock:  Gina K Designs Pure Luxury Pure White, Onyx Black.  My Mind's Eye Meadow Lark 6x6 pad.

Stamps:  Mark's Finest Papers Not So Ugly

Ink:  Versafine Onyx Black

Markers:  Stampin' Up! Only Orange, black marker from stash.

Embellishments:  May Arts Seam Binding, Recollections rhinestones.

Adhesive: Scotch ATG, foam tape, glue dots.

Tools:  Paper trimmer, bone folder, scissors, Martha Stewart scoring board.


Cards Using "Oh Baby":

Card Stock:  Gina K Designs Bubblegum Pink, Littleboy Blue, Stampin' Up!  Very Vanilla.

Stamps:  Mark's Finest Papers  Oh Baby.

Ink:  Memento Tuxedo Black, Versafine Onyx Black, Colorbox Fluid Chalk Ink Creamy Brown.

Embossing Powder:  Martha Stewart Clear Glaze

Markers:  Bic Mark Its Yellow Blaze, Summer Melon, Copic 0

Cricut Cartridge: Basic Finds and Shapes

Embellishments:  May Arts Jute Twine, peachycheap.com washi tape, Stampin' Up Basic Jewels Basic Pearls.

Adhesive:  Foam tape, glue dots.

Tools: Paper trimmer, bone folder, scissors, Martha Stewart scoring board, Cricut Mini, Ranger Blending Tool.

Craft Your Passion #145 Gone Country

Happy Monday!  Its that time of the week where there is a new Craft Your Passion challenge, and this time we are asking you to go country.  Here is what I came up with:


I started with this lovely winter scene from DSR Designs.  There is something about wintery snowy trees that I love.  Once the trees were printed on white cardstock I distressed the edges and inked them.  I added some glitter pen to the trees to mimic cold winter day after a storm.


Once I had the image I started construction of the rest of the card. When I think country I think homey patterns, natural textures, mismatched embellishments, and a bit of distressing.  I chose papers from a My Mind's Eye Miss Caroline pack.  I thought the floral and the gingham combined with the white washed wood patterns were perfect.  I cut everything down and inked the edges with light brown.  A kraft card base was perfect for this project.


I matted the image with the gingham, and adhered the floral and wood patterns together. Once I added some ribbon and twine I foam taped the image panel to the front, and added some mismatched buttons threaded with twine.


A final touch to the card front was a twine bow and two mismatched stick pins.  For the centre I layered some of the same patterns, and some distressed and inked white.


Now its your turn!  Simply create your country project and link it up at Craft Your Passion Challenges by Sunday January 20.  You have a chance to win some great prizes so don't forget to check the blog to see what is up for grabs!

As always the wonderful DT has some lovely projects for your viewing pleasure.  Don't forget to check them all out! :)


I used the following supplies to make my card:

Card Stock:  Neenah Desert Storm, Solar White, My Mind's Eye Miss Caroline Howdy Doody 6x6 pad.

Stamp:  DSR Designs Stamps Winter Trees

Ink:  Colorbox Fluid Chalk Ink Creamy Brown

Embellishments:  May Arts Jute Twine, American Crafts Satin Ribbon, Little Yellow Bicycle Stick Pins, buttons from stash, Sakura Gelly Roll Glitter Pen.

Adhesive:  Scotch ATG, Scotch Quick Dry, glue dots, foam squares.

Tools:  Paper trimmer, bone folder, scissors, Martha Stewart scoring board, Ranger Blending Tool, Tonic Dressing tool.


I would like to enter into the following challenges:

  1. One Crazy Stamper - Anything Goes
  2. Pause Dream Enjoy - Use Ribbon
  3. Party Time Tuesdays - Sparkle, Glitter, and Shine
  4. Ribbon Carousel - Winter Spirit