Supplies
needed:
Paper
– I like to use thin kraft parcel paper from roll, but any paper will do. Just keep in mind the thicker the paper the
less layers you will be able to use. In
addition to parcel paper, this technique works really well with newsprint and
book pages.
· Circle
dies or punches.
· Water
bottle
· Embellishments
– I like to use self adhesive gemstones but you can use larger decorated brads
or any kind of embellishment you like.
· Mini
brads – if you use a decorated brad you can skip the mini brads.
· Liquid
glue (optional). I like Scotch Quick
Dry.
· Heat
proof dish (optional).
· Heat
tool (optional).
· Craft
pick.
Step
1: If using thin paper, fold several
times so that you can punch or cut several circles at once. If you are using thicker paper you may wish
to skip this step.
Step
2: Die cut or punch several
circles. I used eight circles for each
of my flowers but the thicker the paper the less layers you need to use. When using patterned paper I usually use four
or five layers. That said, the bigger you make your circles the more layers you
can probably get away with.
Please
excuse all of the paper dust on my well loved Cuttlebug! I am cutting several
sizes of circles here as I wanted to make several sizes of flowers. I use the same size circle for each layer of
my flowers.
Step
3: Spread the cut circles out on your
work surface and spray the heck out of them with your water bottle. You want them to be very wet.
When
you see the finished project you may think that you can skip this step, but the
wetting really helps the paper to form a nicely shaped flower in the end. Trust me, it will be worth it!
Step
4: Drag the circles around your work
surface into any puddles of water remaining to make sure they are thoroughly
soaked. Gather them up into a pile.
Step
5: Scrunch up each circle into a tight
wad. They look almost like spit balls
only less yucky, lol.
Step
6: You can let these wads dry on their
own, if this is your preference skip to step 8. If you are impatient like me on
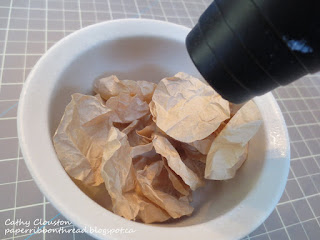
the other hand, place all of the paper balls into your heat proof dish. I find this is the easiest way to keep them
contained while drying.
Step
7: Use your heat tool to dry the paper
wads. If you find they tend to fly out
of your dish, use a scrap piece of paper to shield the opening of the dish. Don’t use your hand as this is a really easy
way to get burned (guess how I know).
Step
8: Carefully unfold the paper wads. Don’t flatten them too much.
If you
find the circles are still damp in the middle you may wish to put them back in
the heat proof dish and use your heat gun again.
Step
9: Stack the circles. Again, mine are 8 layers thick, but you may
wish to experiment to find out what you like best. Try to line up the edges as best you can, but
as the circles are crinkly this can be difficult so don’t worry if it’s not
perfect.
Step
10: Use your craft pick to poke a hole in the centre of your circle stack.
Step
11: Add a mini brad, or a decorated brad
if that is what you would like to use.
Step
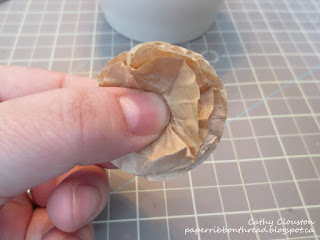
12: Scrunch up each layer with your
finger tips. I try to scrunch each layer
separately as they tend to stick together if you don’t.
At this
point you can always add a little ink or mist.
If I am making a bunch, I will often stop here so that I can decide on
ink and embellishment once I am actually finishing my project. I usually keep a big bunch of plain flowers
in a plastic zipper bag in my embellishment drawer.
Step
13: If you are using self adhesive gems,
add yours to the centre of the flower.
You may wish to add a bit of glue to make sure it stays in place.
Step
14: You may have flattened your flower a
bit when adding the center so this would be a good time to ‘re-scrunch’ the
petals.
All
done!
See how
easy that was? I broke the process down
into a lot of steps but once you get going it really doesn't take much
time. In fact, I cut a bunch of circles in
the beginning of this tutorial with the intent to save most of the flowers for
a later date, but once I got them done I decided to embellish them all:
Click here to see my finished project. I hope
you enjoy making these flowers! :)


Wow, Cathy! Stunning!! Gorgeous flowers! I am going to have to give this a try. Seems a little easier to play with than the tissue paper flowers. Can't wait to try it!
ReplyDeleteCathy,
ReplyDeleteThanks for sharing this awesome scrunchie flower tutorial.
Thank you for sharing this technique!
ReplyDelete